Sunday, February 26, 2012

Not Just For Coffee

Hey everyone,
just wanted to start off by say sorry i haven't been on blogging in a bit, we all just got over a bad head cold so i haven't been on the computer much. Also i have lots to post about in the next couple of days. I painted my bedroom finally and I've cleaned the basement and my craft room, also i started dieting an exercising so i might post about that too sooo lots to come.
Anyways i wanted to share with you my latest craft project.

One of the many blogs i follow (the Country Chic Cottage) posted a tutorial on how to make this Coffee filter wreaths which is totally amazing a springy. So you know i had to try it because its SO inexpensive and beautiful. First i started out colouring some coffee filters with gel food colouring and water but unfortunately i didn't like they way my colours turned out. It was to load and screamy and i wanted soft and suttle. SO i choose to do it all white for my first wreath, But I'm definitely gonna try more done with tea or coffee or even red wine. Also you can make these with cupcake liners for a tighter smaller wreath.  The sky is the limit with options for these wreaths, i think they will be fabulous.
 Heres a look at some other wreaths aswell


So everyone hop on over the country chic cottage and make one of these great wreaths. I think this one is going on my front door soon until then it will hang in my entrance way.

Wednesday, February 1, 2012

Kitchen Floor & Buffet Update

Day 6- We started working on the dining room area of the floor. We have the old laminate cut and removed and we installed the underlay

Day 7- I got the tile laid except one spot where craig needs to fix and finish putting underlay down before i can finish laying my tile. It's starting to come together
Now we need to grout and seal the grout, and install baseboard trim.

On another note i started stripping my buffet tonight. Just the top to see how the paint would come up. Literally took me 20 mins to peel the paint off. First i used the scrapper with the stripper which worked great and then i used an old toothbrush with the the stripper and it worked awesome so heres how shes looking

Sunday, January 29, 2012

New Kitchen and Dining Room Floors

So we finally started on the kitchen. We shopped around for new flooring in the kitchen for awhile now and couldn't find anything we agreed on that we both loved. So finally i got frustrated and said lets go with the one that Craig had loved, which was a nice tile but i wasn't 100% loving the colour. But now that we have half the kitchen and dining room area done, I'm really loving it. It definitely makes the kitchen look more open and brighter.
SO we purchased the Traffic Master Tile, Its a peel and stick tile that is about 1/4 inch think (not your average thin cheap peel and stick tile) this tile you can lay down tight together or you can lay it with spacing so you can grout it to the floor. Which we choose to do. Our tile we picked looks like white marble and its called Roman Travertine Grey. You get 30 tile per case that are 12x12inches for $41.70 at Home Depot. We were lucky to purchase our tiles when there was a no tax event on flooring at Home Depot. 

Day 1- 
 First we started by cleaning out the space and giving it a good vacuum. The dining room has the same matching laminate flooring as the rest of the house. But to make the kitchen look bigger and to finish the other closets off we choose to rip up the dining room floor. Make it look more cohesive and now we don't have to try and find this laminate flooring.

 The kitchen area use to have this really bad and ugly peel and stick flooring that didn't match the other flooring in the house.


 My next step i switched the fridge and 3 drawer cupboard to make sure they fit, which they do beautifully and gives me more kitchen counter space. ( I've wanted this done since we bought the house)

 Then when Craig woke up because hes on nights we started to peel up the kitchen peel and stick flooring. Which was going super slow with one scrapper. So i went out to purchase another one and Craig called and told me to purchase this Amazing tool
It is a Jobmate Heat Gun, I purchased it as Canadian Tire for $14 and it was worth every penny. Just peel up and corner of the tile and heat under the tile and it softens the glue and the tile comes off with ease.

 Kane even got in on the action fixing the floor.

 Then we started by laying all the full tiles with spacers and called it a night.


Day 2-
We went around the perimeter and cut and added the odd tiles. Craig let me do this because his weren't turning out right. Then we started to grout, But being a typical man Craig didn't read the instructions nor did he realize that he was grouting the floor with mortar because his father has given us the wrong bucket. So at 9pm at night we head to Bracebridge to get the right bucket of grout. Which we didn't finish grouting until 1:30am but it was nice because it needed 16 hours to dry. So day 3 consisted of drying time.
 The finished product looks good though i must admit.

Day 4-
 We moved the fridge back and the 3 drawer cupboard and its starting to look like a kitchen again. No more take out for awhile. Last night i made homemade Lasagna with garlic bread and 48 cupcakes, which i sent 30 with Craig to work and 12 ended up in the garbage because coloured chippers fell to the bottom of the cupcake and turned into gooey.
Over all we all LOVE the kitchen floor, Even the cat its his new spot to sleep. Now its time to start the other half, the dining room.

Friday, January 27, 2012

My Newest Treasures

  
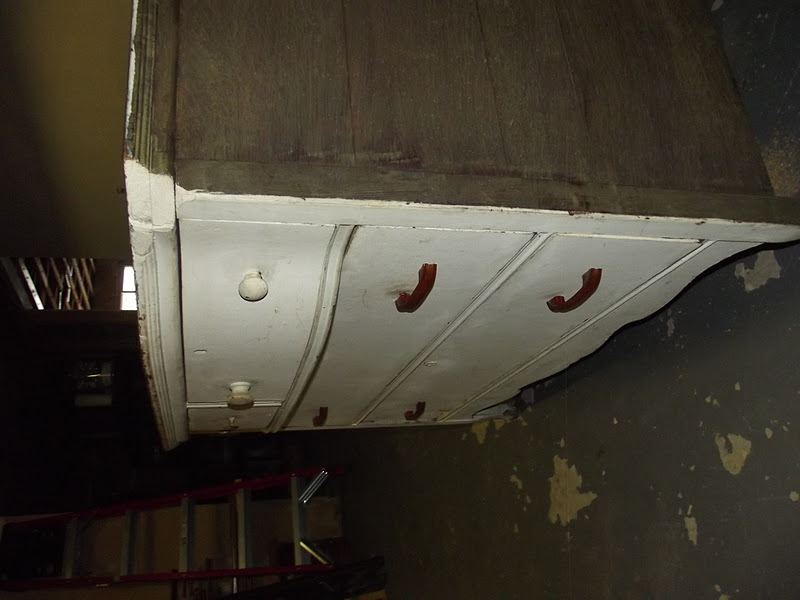
(This is the original picture from the ad) I have an account on Facebook and on there i am a member of the Muskoka 24/7 yard sale. It's amazing, its like a non stop yard sale people post everything. I hadn't purchased anything of it until now. I came across this lady selling this dresser which is actually an antique buffet that was her grandmas. Her Grandmother has owned this buffet for 40-30 Years, she recently moved and was parting with some stuff and she was offering $50 for it. At first i didn't think i was going to get this buffet because there were 3 or 4 other people interested in it. But they had all dropped out at the last minute and it was still available. So i asked her if she would take $40 for it, well it worked because now shes safe in my basement waiting for some desired attention. After she had sold it to me there were 2-3 more people still interested in it.
The handles are not the right handles for this piece except maybe one. I plan on Purchasing glass knob drawer pulls for the top 2 smaller drawers and some vintage looking ones for the bottom 2 drawers. The Dimensions of this buffet are 2ft 11 Inches tall, 45 inches long and 22 inches deep

My buffet isn't even fully painted and I'm sure there is really only one coat of white paint on this buffet. I went to home depot last night and purchased a furniture paint and stain stripper. I think i will restore it back to the natural wood with a nice rich stain. There is a part of this right corner missing but i think it adds character and story to this piece.

It even has the key holes and metal lock assembly in the drawers. except the top left smaller drawer is missing its. Both the smaller drawers are missing the little metal key whole covers.

This is a very solid and sturdy piece. It has dove tailed drawers. Its rather heavy when all the drawers are in it.


I cant wait to dive into this project and when shes finished I'm going to put her in front of my dining room window as a beautiful sideboard. Id also like to thank Kim for selling me this great piece and this buffet will be forever in great hands

Today i also hit the Sally Anne for my weekly pick of treasures and here is what i got.

 I got this great frame for $8, which is a little much but i had 3 people stop me on the way out wanting it.
 I bought this weird iron candle holder thing, I liked it, it was $2 and i think it might become a decorative chandelier or something for outside
 I got this amazing silver tea pot for $5, its sooo pretty, but my sister might end up with this.
And i got this teal blue antique mason jar with the lid that clips to a tight close for $1.50, you can never have too many treasures.

Wednesday, January 11, 2012

The New Bedroom Inspirations

So here is the post i promised to share with you about our master bedroom.

The theme is BEIGE, TEAL and ZEBRA
For our room we choose to paint our walls this great beige, brown grey colour. It actually looks really grey on the computer but its not on the actual paint chip
Desert Castle by the CIL paint Selection

 I love the look of the beige or creamy walls with the white bedding and soft touch of the rich brown and dark wood. Craig's grandma gave us a great white heavy comforter that id love to use on the bed. Also i have a similar zebra blanket that id like to fold at the end of the bed for a little extra added style.
The cubie in the wall id like to paint all the paint out white and replace the missing piece of trim. I'd also like to swap out our existing tall dresser and purchase a used wider 6 drawer dresser for our room similar to these two styles of white dressers.

 Above the headboard id like to hang either my other votive holder i had shown in an older post or purchase a star burst mirror or i even like the line up of picture frames.
 I would like to purchase bigger lamps for our master or even switch out the shades for something in this great teal.

 Id like to add throw pillows that are again teal and or zebra print (maybe both).

I haven't chosen anything for the curtains yet but i will find something when i go to fabric land next. Also if i have enough room id like to add a little chair and closet doors.