Friday, February 25, 2011

Craft Room/ Laundry Room Inspirations

So you have heard me talk about my laundry room which I am going to be creating into my own crafty den. A place just for me!
Let me refresh your memory of my laundry room;
BEFORE
this is from the previous owner
Once we got our new washer and dryer.
Now that I have started working on it....


So I do have a lot to do in this room and I know it probably will never be perfect.
so far I am going to;

  1. Fix the eaten drywall
  2. Add barn board
  3. Plaster all the seems and cracks
  4. Replace the window
  5. Add trim
  6. Add a shelf along the block ledge
  7. Paint the top half green
  8. Paint the bottom half and all trim white
  9. Find vintage or cutesy fabric for curtains
  10. Build a 10.8' long desk
  11. Buy a filing cabinet
  12. Install cork adhesive board 
  13. Set up sewing machine
  14. Organize all craft supplies
  15. Find artwork
  16. Add a door
  17. Paint existing cabinet
  18. Add countertop over washer and dryer
and that should keep me busy for awhile and help past time until I can be outside.

So for my laundry room I found this great colour at Canadian Tire on the mistint shelf for $5.

I couldn't find the name, so... I'm calling it creamed peas because it reminds me of peas or avocados.
As you all know I keep a home inspiration book but I also keep folders on my computer full of pictures. So I thought I would also show my favorite craft room inspirations that I have collected over the years.


Thursday, February 24, 2011

Gadgets

For the past 4 weeks roughly, I have been sick with the flu. This week I went to the doctors to discover I have a chest infection. So lately I haven't been doing much of anything. Although I did start working on my laundry room and I did clean my storage room downstairs.
Today, I did do something crafty. About month or so ago I bought a new cell phone because I thought we had accidentally disposed of it at the Orillia McDonald's but it turned up to be hidden in Kane's room just a week or so after I had purchased my new cell. I purchased an INQ CHAT 3G. I love this phone but I don't like how you can never find anything to go with it like covers and etc. When you purchase the phone it comes with 2 great covers:


 My phone is on the left, then its the fish cover in the middle and the red cover on the right. I like the fish cover but I love the red but I wanted it to be different, I've been looking for a zebra skin cover or something funky but have yet to find one. So until then I had to be crafty and improvise. I found these great Laptop stickers.
What's better then a giant sticker for my cell cover and if I don't like it, I can peel it off! So I just stuck it on and then cut off the excess. Then I used a plastic card like my Sobeys point's card or your debit card to smooth out the bubbles and TADAAAAA!
A great new cell cover for $1.50! I definitely wouldn't be able to buy a new cover for that price. Craig and I have the same cell phone and he didn't like either cover so he used plastic KRYLON paint and painted his cover black. It also looks amazing


(Sorry for the glare.)

Wednesday, February 16, 2011

A found Treasure

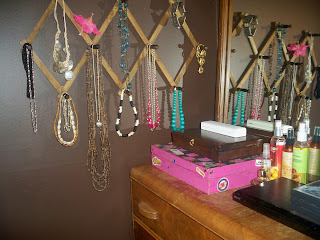
As you all know I have been doing spring cleaning and in amongst my cleaning I uncovered a box and in it was; my jewelery boxes, Kane's baby book, my set of 5 cranberry glass votives, some magazines and this neat hanger. There was a tag on it for 50 cents. Pretty sure I purchased it at the Heritage Shop in Bancroft.
 As soon as I saw this great functional piece I knew right away what my plans were for it. To hang all my jewelery in my bedroom and if anyone knows me they know I have a crazy collection of accessories that I wont be able to display it all.

 I even found a great spot for this great super heavy mirror I got for $5 at a church yard sale in Orillia. A perfect space for my girly things!

Monday, February 14, 2011

Spring Cleaning

So yesterday I started my spring cleaning, I know it's not spring yet but I want to get my basement done before spring because I have tons of yardwork and planting to do. So I started cleaning this dreaded hole. Most of the basement is already drywalled and well the other is chewed. I'm not kidding


 This is the first room in the basement

Then we have the hot pink storage room, which is technically bedroom #4. You couldn't even get in the door in this room before, yesterday I donated;
-4 full black garbage bags of boys clothing
-1 box of shoes
-1 box of bottles, sippy cups, plates and bowls
-1 full box of miscellaneous junk we have no need for
also any curtians that were in the house and I didn't want we donated as well.
 Our very disgusting 2nd Bathroom which we dont use, but it works. Just needs updated
 The storage area under the stairs that I have not entered.
 Our central vacuum that came with the house and we havent looked at yet

 this is the next area in the basement and it is the largest and most central space
 Bedroom #5 that is Craigs work shop and man den. ....for right now
 My wonderful laundry room. Which I am going to be creating a laundry room and craft room combo.  you will note that the drywall has been eaten in my laundryroom. Apparently, the previous owner had at one time 30 bunnies running loose in the basement and well they did some destruction.


Soooo once I have my spring cleaning done I will be starting my basement makeover. I have already come up with some ideas for my laundry/craft room so maybe my next post will be my inspirations.

Sunday, February 13, 2011

Sweets for my Valentine

If anyone knows my Craig you know the way to his heart is through food. This year I didn't decorate for valentines but I did do some baking. A few weeks ago I made 72 cupcakes and Craig took 40 of them to work. Out of 14 guys they ate 38 of my cupcakes which is awesome but they did get branded LOVE MUFFINS and guys I are still asking about them. Well for my valentine Craig I made him this.....

PEANUT BUTTER FUDGE


 I've had this recipe for a long time but never made it, so I tried it in advance to valentines day
and it's awesome.......
so heres the recipe

1/2 cup butter
2 cups brown sugar
1/2 cup milk
1 1/2 cups crunchy peanut butter
1 tsp vanilla
2 1/2 cups confectioners sugar

1. Melt butter in a medium size saucepan on medium heat. Stir in brown sugar and milk. Bring to a boil and boil for 2 minutes, stirring frequently. Remove from heat and stir in crunchy peanut butter and vanilla. Pour over confectioner sugar in a large bowl, beat until smooth. Pour in a 8"x8" pan. Chill until firm and cut into squares.


So simple and delicious,
next time I make this fudge I might try it in a bigger dish so fudge is more shallow. Also I might try drizzling it in milk chocolate. It would be amazing rolled into balls and dipped into chocolate too.
So many great way to make treats for someone you love.

Thursday, February 10, 2011

MY ENTRANCE ARTWORK

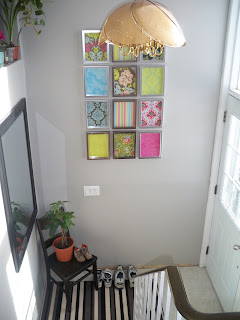
So everyone has been asking me how I did my entrance artwork. So here we go, I made this great piece of art for only $34.50.

I first purchased this great collection of AMY BUTLER scrapbook card stock paper. It's amazing, everything blends and works together. The paper is almost too beautiful to use. It was instant love at first sight and I knew I had to have it. This pack of amazing double sided happiness only cost me $10.50 at Walmart.


At first I didn't even know what to do with my paper it's too pretty to cut up, but I knew it would only be a matter of time before I found the perfect creation for this paper. Then I was at Dollarama and found these great silver frames for $2 so I had first bought 6 frames. Later on I decided 6 wouldn't be enough for my wall I wanted to feature them on, so I purchased another 6. 12 frames for $24. Pretty Good!

 Next I went through and picked (with the help from Craig) which sheets of paper we loved the most and worked well with each other. Then I placed the frame with the glass over the paper to get the right placement of each sheet I wanted to display.  I even tried it with the Matte in the frame. If you want you can always do that too, for mine I chose to go without the matte. Then I took the paper that came in the frame and used it as a template to cut my paper down to size. NOTE: you don't have to use card stock you can use any kind of paper or fabric even
If you want to use a template that is sturdier then try using the glass from the frame if it pops out to cut the perfect piece of paper.

Then to assemble it I chose to put the matte behind my paper then the backing. That way if I choose to change my artwork in the future I have the proper piece of matte for my frame.
After I completed all 12 it was time to clean them. I wiped all my frames down with a little bit of Windex and paper towel to remove any dust or fingerprints that might have collected from assembling. Then I laid them all on the floor and rearranged them all until I had the right placement worked out.

My next step was to measure dead center of my wall and choose exactly how high I wanted my first piece to be hung, then I measured and used my level to make sure they all were 1" apart. There you have it a simple and super easy and very versatile piece of artwork that anyone can do and personalize for themselves.