Wednesday, April 27, 2011

Happy Birthday Craig


Yesterday was Craig's 24th birthday so we had a pretty relaxing day. Kane and I went out in the morning and did a little grocery shop and we got Daddy timbits and a large double double. When I got home I made Craig lasagna and garlic bread for dinner. I also finished preparing his Birthday cake. 
This year I didn't know what kind of cake to make Craig because he doesn't like anything super sweet. He hardly ever eats chocolate except his favorite Reese's Peanut Butter Cups. HE LOVES THEM. So when I stumbled across this awesome blog Annie's Eats
and found this amazingly delicious looking Reese's Peanut Butter Cake, I knew it was the cake for him.


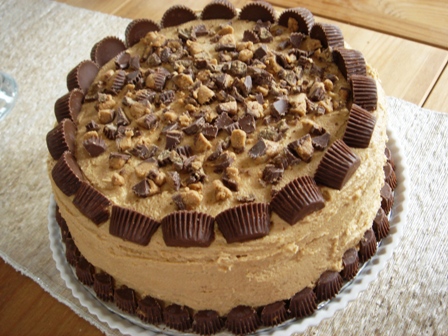
Except I didn't make her recipe because I knew Craig would want his vanilla cake. So I began a search online and through my cookbooks for Vanilla cake and Peanut butter icing. This is my cake:


Her cake looks way better than mine, but this is also my first attempt at this cake. The recipe I used for the white cake I found on All Recipes http://allrecipes.com/Recipe/Heavenly-White-Cake/Detail.aspx

Ingredients

  • 2 3/4 cups sifted cake flour
  • 4 teaspoons baking powder
  • 3/4 teaspoon salt
  • 4 egg whites
  • 1 1/2 cups white sugar
  • 3/4 cup butter
  • 1 cup milk
  • 1 teaspoon vanilla extract
  • 1 teaspoon almond extract

Directions

1.     Measure sifted flour, baking powder, and salt; sift together three times.
2.     In a mixing bowl, beat egg whites until foamy. Add 1/2 cup sugar gradually, and continue beating only until meringue will hold up in soft peaks.
3.     Cream butter or margarine. Gradually add remaining 1 cup sugar, and cream together until light and fluffy. Add sifted ingredients alternately with milk a small amount at a time, beating after each addition until smooth. Mix in flavorings. Add meringue, and beat thoroughly into batter. Spread batter in a 15 x 10 x 1 inch pan which has been lined on the bottom with parchment paper.
4.     Bake at 350 degrees F (175 degrees C) for 30 to 35 minutes. Cool cake in pan 10 minutes, then remove from pan and transfer to a wire rack to finish cooling. This cake may also be baked in two 9 inch round pans for 30 to 35 minutes, or in three 8 inch round pans for 25 to 30 minutes. 

This cake taste amazing but I find it rather dense especially since it’s a meringue base cake. thought it would be light and fluffy, I might have overworked mine.

The icing I found on all recipes too but I altered mine http://allrecipes.com/Recipe/Fluffy-Peanut-Butter-Frosting/Detail.aspx

Ingredients

  • 1/2 cup butter, softened
  • 1 cup creamy peanut butter
  • 3 tablespoons milk, or as needed
  • 2 cups confectioners' sugar

Directions

1.     Place the butter and peanut butter into a medium bowl, and beat with an electric mixer. Gradually mix in the sugar, and when it starts to get thick, incorporate milk one tablespoon at a time until all of the sugar is mixed in and the frosting is thick and spreadable. Beat for at least 3 minutes for it to get good and fluffy.

This icing is delicious but I found it tasted more like butter and light on the peanut butter, so I added an extra 1/2 cup peanut butter and 3 more tbsp of milk to make it smoother.

 Overall I liked this cake but next time I'm making it with chocolate cake and I think Craig had a good birthday but out of it all I'm sure he loved his Boston’s Celtics Jersey I got him the best. He’s been wanting one for years and I finally found one.

Monday, April 25, 2011

YARDWORK HARDWORK

I am almost afraid to continue raking outside. Every time I get raking I find more and more garbage under the leaves and sticks. Though I've come along way and I thought today I would post my progress outside. First I would like to start with my front flower bed.


It's all cut up and leveled ready for some manure or top soil. I haven't been able to move the cedar bushes beside the tree as it’s too early to transplant yet.

Another thing I got done today is the lattice on the deck, I removed the top half.....Looks pretty Ghettorific


LOOKS AWESOME!! Will be even better when we install new decking and railings and to finally remove the brown.


 When I went to remove the first gate today I realized it’s a double open gate. So I think I might paint it and move it back to where the black gate is, giving us a wider opening to the back yard.


Also I have started removing the weird stone wall that connected to tree to the pond. Slowly the yard is coming together. Lots of Hard work

I also started a little revitalize project for the yard

I love the size of these two planters and shape of them, just not the colour. Soo paint it is what I did.


 I didn't paint the whole interior as I will be filling it will dirt anyways, just wanted to paint down enough so it looks like its all green.


They look like 2 brand new pots. I think I will place them on my front step. Perfect colour!


 I wanted to show you how tall they are. They make this 1 gallon paint can look small. I will have to post about them later when I fill them and add flowers until then I'm
One step closer to a little more curb appeal.

Sunday, April 24, 2011

Kitchen ReArrange Attempt 1: FAIL


Happy Late Easter Everyone! Hope everyone had a great weekend. Good Friday I worked in my garden all morning and will have pictures to post later. Tomorrow is Curb Appeal Day for me. I'm sooo excited to get out there and get some much needed yard work done.
Today I thought I would blog about my first attempted kitchen rearrangement. I tried a couple of days ago to rearrange the kitchen. Which was easy because the three drawer cabinet and the pots and pans cabinet is not attached to the wall, very easy to pull it out. I proceeded to pull out the fridge and disconnect the water line. Which was so easy but then when it was time to shove the water line through the floor the hole was too small. I don't even know how they got it through there in the first place. I tried drilling a new hole beside it to make the hole bigger but I could not get it through the floor. I tried 2 different drill bits and nothing. The existing hole is between joists so it’s not like there is anything to hit there. FRUSTRATING... So close but soo far away. Not to mention Craig had woken up and gotten mad at me for ripping apart the kitchen but if he'd just help me move stuff or work on the house I wouldn't have to try by myself.
Another issue I had was the dishwasher drain. It sits like 2 inches too high. So looks like I might have some plumbing work ahead of me. On the plus side I found a place for my mirror and I did remove the horrible floating shelves I had in the kitchen.


I also turned my table and chairs. Not sure if I like it this way yet. Craig loves it, but I am leaning more the other way.


So attempt 1 Fail but at first you don't succeed, try try again.

Monday, April 18, 2011

Kitchen Plans

Lately the kitchen is really bothering me, Craig doesn't care because he mainly cooks on the BBQ now. Not only is it small but there is no counter space when you want to cook or bake something which I love to do it gets frustrating. The only counter space we have to use is between the sink and the stove or on the other side it’s between the coffee pot and the sink. We thought about a small island on wheels but really for the space it could only be a foot wide. So we've been thinking about changing the kitchen counter tops and why not try rearranging the kitchen cabinets a little before we make such a large purchase and regret not trying to change it around. Sounds like a horrible job moving the cabinets but really we don't plan on moving a lot.

Here is what our kitchen currently looks like:


The fish tank on the counter is obviously going; we just don't have anything else to put it on right now it was a quick fix when we moved in. I'd also like to remove the shelves above. Today I drew up sketches so you can get the idea of what we'd like to do. Don't laugh but they are free hand drafts so they aren't exactly proportionally correct but you get the idea at least.   


This is a drawing of what our layout is like now and the measurements of all the cabinets (except the upper cabinets). I did do my math before I started ripping out cabinets. Make sure we have proper room for our rearrangement.


AS you can see we would like to trade the fridge with the pots and pan cabinet. This would def give us extra counter space right beside the stove. We'd also like to shift the dishwasher and 3 drawer cabinets down by 2-4 inches to make room for the fridge.


 Here is a rough view of how it would look. Beside were the fridge went we could get either extra upper cabinets or install shelves to allow for my storage and provide more room by the sun porch door.


As well as above the pots and pans cabinet we could install shelves or upper cabinets. I think this would definitely open the kitchen more and add more functionality to the kitchen without replacing the whole thing. We do need to replace the counter tops as they do have burn holes and chips. And yes even one part of the counter top is divided into sections. We are thinking about staying with white counter tops as the corner gets pretty dark. We want to lift and brighten the space while keeping the black cabinets.


We would also like to replace the flooring in the kitchen area. Right now it is this horrible faux parquet floor tile, that is starting to peel up everywhere and not to mention is horrible to clean. We are thinking of installing a darker ceramic or slate tile floor, to modernize the space. We also need to install kick plates on the 3 drawer cabinet and the pots and pans cabinet. We are also thinking about installing this great faux ceiling tile back splash like THE STARTER HOME has done in her kitchen
LOOKS AWESOME! She also hand painted her kitchen counter top with acrylic paint and then add a pour on high gloss sealant. Looks amazing, but our counters tops are in too rough of shape or else id try it too.


We won’t be able to afford everything all at once, but even if we could change the cabinets and fridge around, then work project by project until it’s finished would be awesome.
It would definitely lift the kitchen for pretty cheap.
Here is a list of what we need
1. New flooring
2. New counter tops
3. New kitchen sink and faucet
4. New lighting
5. New paint for the cabinets
6. Paper and paint for back splash
7. Shelving or extra upper cabinets.
8. Time to do everything LOL

We will keep you posted on any further action to our kitchen.


Easter Inspirations

 With Easter approaching this weekend, I having hardly any decorations up or baking done I thought I would share some great inspirations I found online not only to help me but maybe inspire everyone else.


Sunday, April 17, 2011

Rustic Homes

Sorry I haven't posted in a bit but I have been busy working and not working on the house. But I did get my flower bed started out front but that is now on hold since we have had a day of rain and today it’s snowing out. I'm sure it will be beautiful by the end of the week and I can finish cutting it up. Since I haven't had time to complete anything at home I decided today's post would be about 2 of the most beautiful houses I love in Bracebridge. It’s a shame they are vacant too. My heart melts for a beautiful brick farm house and there is plenty of houses in Bracebridge I would love to own but these are the only 2 I know of that are vacant.


The first houses I see every time I go to the Habitat restore building. It’s my favorite I want Craig to take me over for a close up look, but I'm sure it’s no trespassing. The house is off in the distance so it’s hard to get a good picture of it with my camera. This house has no more windows and probably has been vandalized over the years. Heard a story that it’s haunted but who knows, just a big empty shell but man is it gorgeous. Just the detail alone is fantastic.


 This house I see everyday I go to work. I’ve got a true soft spot for this one. It’s my lotto winner house, waiting for me. Story is that the man hung himself in the garage. There use to be 2 garages but one was burnt down. So maybe it was the other shed. The property is for lease. I’ve heard he wants a lot of money for it. Not the house but the land because it backs onto the Muskoka river. I'm sure I could gut the house and put a wrap around porch on it and call it home sweet home. I do have the next 2 days off so maybe I will get some stuff done around the house.


Tuesday, April 12, 2011

Felted Butterfly Shopping Bag

Earlier I had shown everyone I had bought these great Teal felt squares

Well here is what I have done with them:


I added some Pizazz to this plan tote bag I had bought at Dollarama for $1.50


 I loved the colour and fabric of this bag, but I especially loved the button closer on it. I thought I would decorate this bag up so its not your typical shopping tote bag.


I simple started cutting out different sizes of butterflies out of the felt. Then I began by placing them out on the bag in variegated like they are flying away. Then I simply came back and ran a strip of hot glue down the centre of the butterfly that way the wings would still lift and have some dimension. I thought about adding beads or glitter down the centre of the butterflies for a little more glitter but in the end decided to leave it the way it was. I couldn't resist I had to post a picture of my little shopper modeling my bag.